 Microscope types
If you visit the show-room of optical maker or if you send a request for a catalog, you will probably find that there are numerous types of optical microscopes on the market.
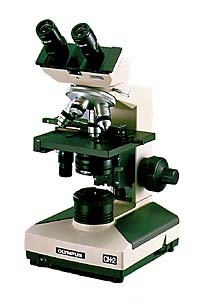
Tipical systematic microscope : You will not need a high power full set. Most of the microscopes are made based on DIN standard, get only what you need. Good quality variable body is recommended. (Photo : Olympus CH-2 series)
Normal type and inverted type in shape, biological microscope, mineral microscope, dissecting microscope for its usage, and phase-contrast microscope, polarization microscope, fluorescence microscope, Nomarski microscope etc. for special feature.
For microscopic observation of animal feces, normal biological microscope will be the best to choose and if you want to study further about protozoan, phase-contrast microscope may be the better choice.
Microscopes can be your best friend for your entire life so choosing a good quality product will not be a waste of money and choosing it carefully will not be a waste of time. It may have higher price but good optical products are usually expensive. But good microscope can be used for several generation so I think it worth it.
Buying a cheap high power poor quality microscope is what you call a waste. Never get involved by extravagant advertisement with highlighted expression of high magnification power.
For the best result, I recommend you to buy a systematic microscope. This is because systematic microscopes can start by least set and if you want to study further, you can add the necessary parts later. Body, head, stage, objective lens, eye-piece are all sold separately and you can choose whatever you like.
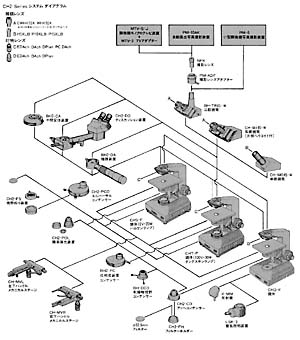
System diagram of systematic microscope : Body, Stage, Head, Objective lens, Eye-piece, etc. are all sold separately. You can buy only the necessary parts and you can save the initial cost. If you find interest in microscopic world, you can add many optional parts later to complete your system. (Olympus CH-2 series)
For a least set, you will need the body, the stage, the head and the objective lens and the eye-piece. This can save the initial cost.
Later, if you are interested and want to study further, you can add many parts to complete your original system.
So, if you can find the good systematic body, whether new or used, you can start with that and later you can add only necessary parts. I will not recommend to buy a expensive full set. Many parts in the set is unnecessary and just expensive. If you start from a least set, you will know what you need and what to buy.
 Body of microscope
Usually, the body of the microscope includes base with lighting system, condenser, movable stage with focusing knob, revolver to set objective lens, and an attachment to set the head part.
Lighting system
If you are going to use high power objective lens, you will need a high power lighting system. Tungsten incandescent bulb will do but halogen type light bulb will do better lighting.
Condenser is usually the Abbe type. Make sure you will be able to light the object by Koehler illumination. And NA of condenser should be equal or larger than the NA of using objective lens. If you are not planning to use objective lens over 40x, 0.65 NA condenser or so probably works. If you are planning to use 100x(oil) lens, NA of the condenser should be something like 1.25 or so.
Focusing system
There is a focusing knob to move the stage. For high power usage, it is necessary to have fine adjustment other than coarse adjustment knob.
Make sure that these knobs has no back-lashes. When you are in an observation duty, you will be busy turning the fine adjustment knob in both directions and it has to respond very quickly.
Stage
For high power observation, I strongly recommend you to add the mechanical stage to your set.
Usually, when you find some protozoan or other moving cells, and if you want to investigate it well, you will have to follow their movements. And they move quite fast and get out of your field soon. If you are using high power lens, it will be almost impossible to follow their movements by moving the slide glass by bare hand. Furthermore, image of the field is a converse image and you have to move the slide to opposite direction of their movements. That makes it more difficult.
Mechanical stage will allow you to move the slide in very fine differential. And if you get used to it, you will be able to trace their movements very correctly.
Revolver
Revolver is often attached to the body. Some of them may be exchangeable. It has 2 to 6 holes to screw in the objective lenses. 4 holes type may be enough for fecal examination.
Make sure the hole diameter and screw pitch is based on DIN standard.
DIN is the German industrial standard and usually good microscopes are made based on this standard. This makes you possible to change lenses to different maker.
 Head
Head
There are several types of head to attach to the body depending on your purpose.
Monocular type is most simple and low-cost head. If your usuage is only to observe through your eye and if you don't use it for long period in a day, monocular type will do.
If you want to use for longer period and want to investigate further, I recommend you to get a binocular type. You will get less eyestrain.
There is a prizm and an interocular distance adjustment mechanism. The bad part of binocular is, it will cost too much. And you also have to buy 2 same eye-pieces.
If you wish to take good photographs or video tape the specimen, it is better to have trinocular head. It is a combination of binocular and a monocular photographic tube specially designed to attach the camera. You will need a pair of eye-piece and a special lens for photographic tube.
 Objective lens
Before discussing about objective lenses, let's study about general subject about optical lenses.
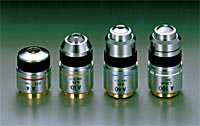
Objective lenses : Objective lens is the most important component in microscope. Choose a high quality oberration corrected lens. Note that high power lens is not always high performance lens. (Photo : Olympus Achromat lenses)
Physically, there are several optical aberrations known now and these are unavoidable. We now know that it is impossible to design a perfect lens which has all aberrations corrected. But mankind is fighting with these optical aberrations since the optical lens was invented. German genius Abbe left the greatest achievement on aberration correction.
Important aberration and correction in microscope lens are chromatic oberration and curvature of field.
Chromatic oberration
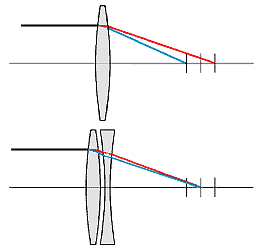
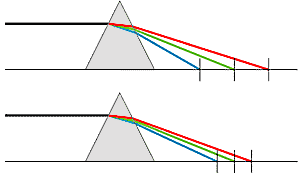
As you can see on an experiment of prisms, white light ray will be decomposed into sequential spectrum. This phenomenon occures because refractivity will be different depending on the light wave. Longer wave-length(Red) has less refractivity, and shorter wave-length(Blue) has more refractivity. Same phenomenon will occure on optical lenses. If you use single convex lens, white light will not converge in a pin-point. It will have numbers of focus point. Blue will focus in inner point and Red will focus in outer point. This phenomenon is called the Chromatic Oberration.
This is the biggest problem which all optical products carry. Especially microscopic lens has to be strict about this chromatic oberration since this differential of focusing point will also be magnifized by total power and only outfocused rainbow edged field will be seen by uncorrected lens.
Curvature of field
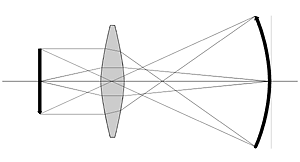
By using single convex lens, focus field will not be a flat plane.
Curvature of field : Focus field of single convex lens will be a part of a sphere.
Physically, it will be a part of a sphere. This aberration will be easily seen with non-corrected lens. If you focus the field in center point, outer part of the field will be out of focus. And vice versa.
Since our retina is also a part of sphere, it may be not so bad but if you try to take picture of the field, only small area near the center will be focused and other part will be blur.
Correction of chromatic oberration
Since spectrum of white light has innumerable wave length, it is impossible to correct all spectrum to focus in one spot.
Abbe found that direction of chromatic separation of convex lens and concave lens occure in opposite direction. He studied refractive index and degree of dispersion of enormous type of glass and found some combination to reduce this aberration.
Achromat : By using convex and concave lens, it is possible to make 2 colors to focus in one point.
In human eye, Orange and Blue color are seen conspicuously. He paid attention to this fact and designed an Achromat lens.
Achromat lens has a correction in Orange and Blue color which means this two spectrum will focus in one spot.
Later, technology improved and found a way to correct three color. Orange, Green, and Blue can be corrected to focus in one spot. This type lens is called Apochromat lens.
Design of Apochromat lens is very complicated and it is a combination of many lenses of both convex and concave.
Mathmatically, it is possible to design 4 color correction, 5 color correction and so on by using computer but number of lens will increase and different problem will occure. Contrast will get lower by using many lenses so these lenses over Apochromat are not made for the market.
Conversely, to make the lens cheaper, there are a group of lenses called semi-apochromat. Few lenses are saved and it will be lower cost than Apochromat and better quality than Achromat.
Recently, there is another approach for correcting this aberration. There are many characters in material of lenses. Refractive index and degree of dispersion are the famous character of glass and other materials. Fluorite is a transparent material can be used as a material of lens. And fluorite is know as a material which has very low dispersion as a character. This means the degree of white light decomposition to spectrum is very little. In other words, it will be a good material for lenses but a bad material for a prism.
Dispersion : If you led white light such as sun ray through a prism, the ray will be divided into a spectrum. White light is a combination of numerous wave-lenght of light and will be separated into a spectrum because the refraction ratio is different in every wave-lenght. Above : High dispersion material. Below : Low dispersion material.
Since it is naturally achromatic, you will need less correction and can save the number of lens combination. That will make a very high contrast lens.
Problem is, it is physically weak and high cost. People are still trying to make better artificial material which has high refractive index and low disersion and physically strong and also cheap. But not yet invented to satisfy all these characters.
Some are already used by name of "ED(Extra-low Dispersion" or "SD(Super-low dispersion)" but usually they are still expensive.
So, actually you will see;
on the market and quality and price is also in this order.
- Fluorite lens
- Apochromat lens
- Semi-Apochromat lens
- Achromat lens
- Non-indicated lens
Correction of curvature of field
Lens designers are working very hard everyday to create better corrected lens.
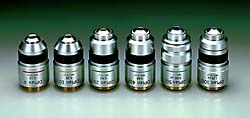
Curvature corrected lenses : Objective lenses which have "Plan" name are curvature corrected high quality lenses. These lenses are best for observation and also for photographs. (Photo : Olympus DPlan objective lenses. 4x, 10x, 20x, 40x, 60x, 100x oil )
Let's get back and think of our eye. Anatomically, lens in our eye is a single non-coated convex lens. But we do not see these chromatic oberration or curvature of field. It must have but we do not recognize it in our normal life.
This is because we are not just looking the image on retina. Image on retina will be sent to your brain by optic nerve and automatically aberration collection process will be done by your brain.
Sight system of animal is amazing.
Brain has an ability of correcting all of aberrations including chromatic, curvature, distortion, etc..
To make sharp field photograph from the image of microscope, it is best to use Plan type lens.
These lenses has specially designed lens component added. This is called the "Field flatner".
There are several type of Plan type lens depending on the correction range. Of course it is also better to use Plan type lens for observation and if your eye-piece is a wide field type, you should confirm that correction range of objective lens fits your eye-piece field.
Other indicater printed on objective lenses
Numerical aperture(NA)
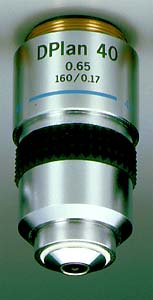
Good quality objective lens : There should be many indicator printed on side of lenses. "DPlan" is a sign for Acromat, field flattened lens. "40" is the magnification. "0.65" is it's NA. "160" is the sign to use 160mm mechanical tobe length and "0.17" is the recommended thickness of the cover-glass. In telescopes and camera lenses, resolution will be proportional to the caliber of its objective lens. This is why we create huge telescopes.
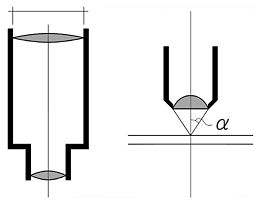
NA(Numerical aperture) : In telescopes, resolution depends on the caliber of objective lens. In microscopes, resolution is specified by n x sin(alpha) when "n" is the refraction index of the medium between the object and the lens.
Diameter of Mt. Palomar's telescope is 200 inches(5m) and Subaru at Hawaii will have 8m caliber.
In microscope lens, we don't use the word caliber and use the word NA instead. It is an indicator of how much light from the specimen will be lead to objective lens. Higher NA lens has higher resolution.
Medium usage
In high power objective lens, the distance between outer lens and cover glass gets very small and the light from the specimen will reflect by total internal reflection.
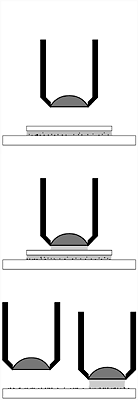
Medium : Use immersion oil for "oil" printed lenses. Immersion oil has same refraction ratio with glass. This will lead you to get more NA.
To avoid this and get larger NA for better resolution, special oil is used for the medium between cover glass and the lens. This oil is called the "Immersion oil". This oil is arranged so it will have the refractive index of 1.516 and this number is exactly the same as those of optical glass. That makes light not to reflect or bend in each contacting surface.
You can see the ice in water because the refractive ratio is different between ice and water. Immersion oil is an interesting material. If you drop glass piece in cup of immersion oil, the glass will be completely invisible.
Usually, objective lenses which have magnification power over 60x are used with immersion oil, and "oil" indicator is printed on the side of objective lens.
Mechanical body tube length
There was 2 type of standard in microscope. Mechanical body tube length (length of objective lens and eye-piece) was different in those two. But now, most of the microscope is standardized to 160mm mechanical body tube length. I guess you will only find 160mm type but it is still marked as a vestige.
Direction of cover glass thickness to use
From specimen to eye-piece is recognized as an optical system. So the cover glass is a part of optical system and the slide glass is not.
To extract the full performance of objective lens, you should use the best quality cover glass as possible. If your lens has 0.17 marking, that means this lens exhibit its full ability by using 0.17mm thickness cover glass. Good quality cover glass has specification list on its box and consistency range.
Example
DPlan 10 0.25 160/0.17
means that it is a Plan type lens, 10x magnification power, NA of 0.25, Mechanical body tube length of 160mm, and use 0.17 thickness cover glass.
A 40 0.65 160/0.17
means that it is an Achromat 40x lens with 0.65 NA. Rest is the same.
PlanApo 100 oil 1.40 160/0.17
means this is a Plan Apochromat 100x lens with 1.40 NA and use immersion oil.
These notation may be slightly different by each manufacture.
 Eye-piece
Total magnifying power of a microscope is calculated by (power of objective lens) x (power of eye-piece lens).
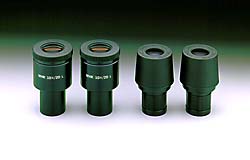
Eye-piece : High power eye-piece is difficult to use. I recommend you to use 10x or lower wide field eye-piece.
First, objective lens enlarges the specimen by its power and makes a virtual image. Eye-piece works to enlarge this virtual image and leads the further enlarged image to your eye.
It is often thought that higher power is better but it is not always true.
For instance, if you use 100x obj-lens and 100x eye-piece set, it seems you can easily get total 10000x power microscope, but this is impossible. You can never look through this 100x eye-piece because focus point from the lens will be way less than 1mm. And before that, 10000x power leads you into a range of light wave length so you will see nothing in the field.
Therefore, maximum power of optical microscopes are thought to be 1000x to 1500x.
There are several indications on an eye-piece lens.
Magnification power
Usually, 5x, 10x, 15x, 20x powered lens are sold. I recommend using 10x eye-piece. Higher power eye-piece is difficult to look through and has very narrow field. And also note that higher power eye-piece does not make the resolution higher. Resolution depends on the quality of the objective lens. If you use high power eye-piece on a image made by low resolution objective lens, blur will just be enlarged and will see nothing.
Field
Virtual image of objective lens will be made just in front of the eye-piece. Eye-piece is designed to enlarge this virtual image.
Optically and/or physically, there is a valid limit range of enlargeable field. This is called the field(number) of eye-piece and indicated by the diameter of enlargeable range on virtual image.
Normal eye-piece has field of 10 to 12. Wide field eye-piece has 18 to 20, and Super wide field eye-piece has 26 to 29. Usually, tube diameter of the microscope is 24.5mm so the wide field type will be the maximum to use in normal microscope. Microscopes designed for super wide field has bigger tube.
Eye-point
If the eye-piece says it has a high eye-point, those eye-piece will be easier to look through. You will not have to put your eyes too close to the lens. People who wear glasses probably think this is more convenient because you don't have to take off your glasses for the observation.
Note
In some microscopes, aberration are corrected by combination of objective lens and the eye-piece, so it is best to buy both lens from same company.
